Distressed Rainbow…
| Affiliate Link Press Sample |
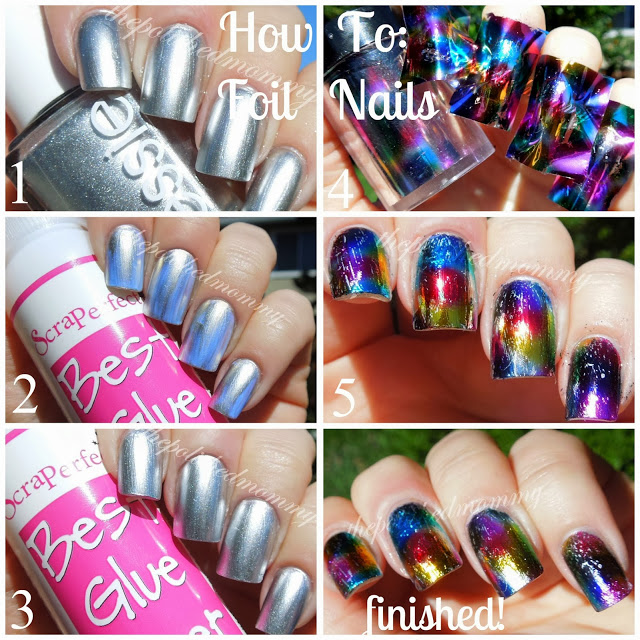
I recently received this Fantasy Rainbow Nail Foil from KKCeneterHK and thought I would do a quick tutorial on how to apply foils..
First apply your base color. Depending on the design, choose a color that matches or contrasts the foil.
(I chose to match using Essie No Place Like Chrome, this way bare spots aren’t easily detectable)
Apply 1-2 layers of glue. You can apply the glue all of the nail for full coverage of the foil or in selected areas to give an interesting effect.
Most foils come with glue, which looks much like white school glue. For me, I like to go with Robin Moses’ recommendation of Scrape Perfect Best Glue Ever.
Let the glue dry completely.
You will know it’s dry because it will change from white to clear.
Cut the foil into small strips and apply it (pattern side up) to the nail. Gently press and smooth the down foil. You will know the foil has fully adhered because it will separate from the plastic backing.
Lift the foil from your nail. Cleanup cuticle area and top coat using a gel or gel like top coat ONLY. Quick dry and other top coats will wrinkle and dull foils so it’s best NOT to use them. I used Sally Hansen Miracle Nail Thickener.
Finished Result…
I really like the design of these foils, I can’t wait to play around with them over different base colors (I think it would look great over black!). And as you can see it’s very important to make sure the entire nail is covered with glue, I think next time I will do a thicker coat to make sure there’s no bare areas.
Price: The foil alone is $7.69(not including glue) or you can get the set which includes glue for $12.

 5-Free nail lacquer by The Polished Mommy


Ooh, I’ve always wanted to try foil but never quite known how to do it! I might buy some now 🙂 Looks great!
http://www.gleepface.com